Implement server-to-server (S2S) consent
Server-to-server (S2S) consent bypasses direct user intervention, easing the consent process for bulk actions required by your integrations.
Step 1: Generate your keys
Use your browser's cryptography API to generate your key pair according to the required algorithm.
await crypto.subtle.generateKey({ name: "ECDSA", namedCurve: "P-256" }, true, ["sign", "verify"])
  .then(async ({ publicKey, privateKey }) => ({
    publicKey: await crypto.subtle.exportKey("jwk", publicKey),
    privateKey: await crypto.subtle.exportKey("jwk", privateKey),
  }))
  .then(keys => ({
    publicKey: JSON.stringify(keys.publicKey),
    privateKey: JSON.stringify(keys.privateKey),
}));
The request generates a response similar to the following sample. The keys in the sample aren't valid, but they do follow the required algorithm.
{"publicKey":{"crv":"P-256","ext":true,"key_ops":["verify"],"kty":"EC","x":"6aMDs-I7qxo3BGqpoQ5Ge5gYqeSqEhWW0h9zTtkpaCg","y":"_FzMHTH96EFVrBt7OKtuCNu0SxY5muVrYJoH0j7gZ0I"},
"privateKey":{"crv":"P-256","d":"uqkeipukPX8kxuhRsijxoGcPjURM7UV6qSvaHJ2Q22I","ext":true,"key_ops":["sign"],"kty":"EC","x":"6aMDs-I7qxo3BGqpoQ5Ge5gYqeSqEhWW0h9zTtkpaCg","y":"_FzMHTH96EFVrBt7OKtuCNu0SxY5muVrYJoH0j7gZ0I"}}
You can also use various libraries and packages to generate keys that follow the cryptographic standards.
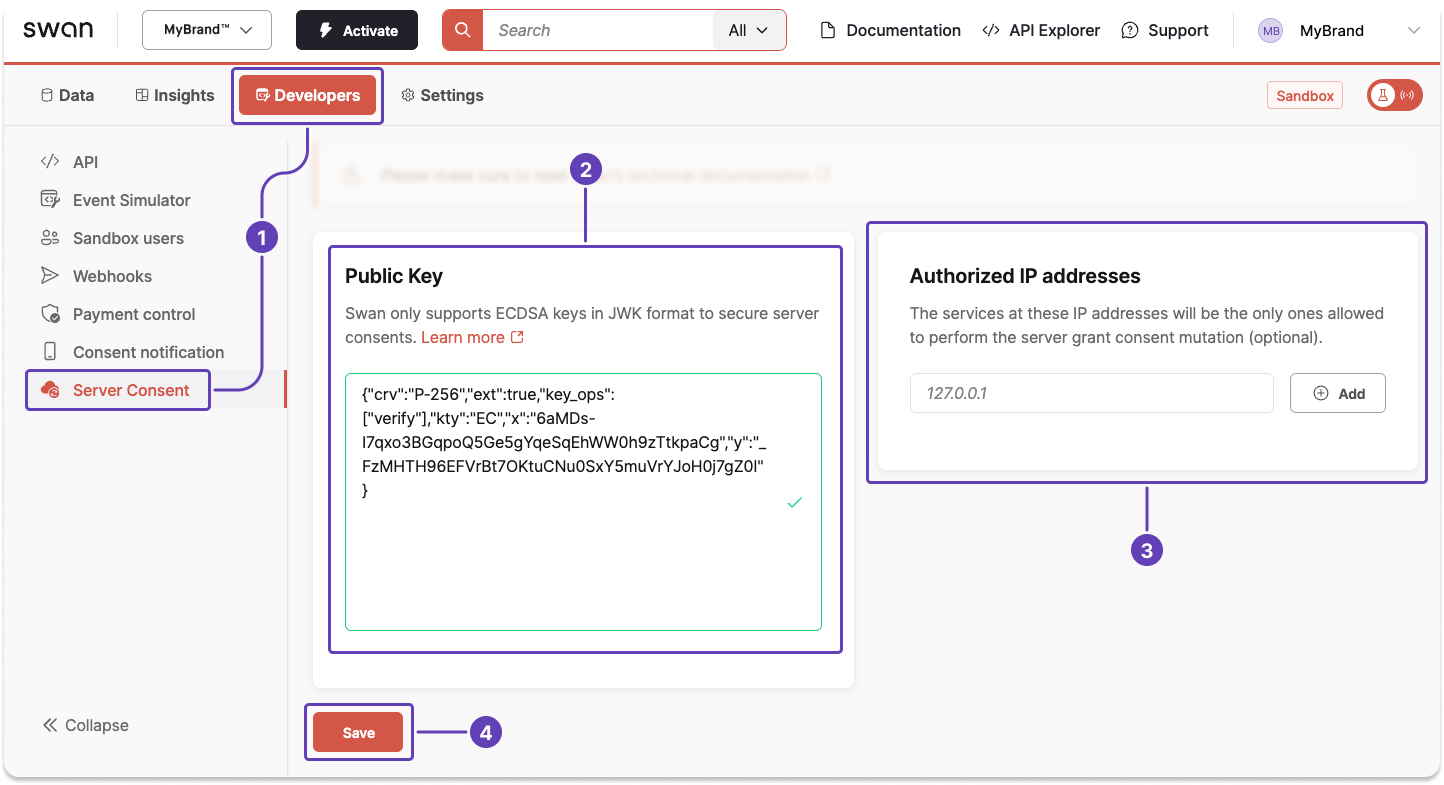
Step 2: Install your public key
Store your public key on your Dashboard to use it for server-to-server consent.
- Go to Dashboard > Developers > Server Consent.
- Enter your public key into the text area.
- Optionally, add authorized IP addresses.
- Click Save.
If you're installing a key in your Live environment, there's an additional step.
After you save your public key, Swan sends a text message to your project's legal representative to consent to adding S2S consent, which includes the first and last name of person installing the key and the key to review.
Step 3: Consent using your private key
Now that you have a private key stored securely on your server and a public key installed in your Swan Dashboard, you can use the keys to grant S2S consent.
If the user access token attributed to your project's legal representative expires and interrupts your process, consider impersonating the legal representative with a project access token instead.
3.1 Get consent challenge
To sign your first server-to-server consent, complete the following actions:
- Request any sensitive operation that requires consent.
- In the payload response, Swan provides a consent
challenge.
{
  "data": {
    "consents": {
      "edges": [
        {
          "node": {
            "id": "$YOUR_CONSENT_ID",
            "challenge": "$YOUR_CONSENT_CHALLENGE",
            "purpose": "AddCard",
            "status": "Created"
          }
        }
      ]
    }
  }
}
3.2 Sign consent challenge
Next, sign the challenge using the following script, the provided library, and your private key.
await signAndExportJwtToken("$YOUR_PRIVATE_KEY_JWK", {
   header: { alg: "ES256", typ: "JWT" },
   payload: { challenge: "$YOUR_CONSENT_CHALLENGE" },
});
function toBase64url(message, toStringify) {
  let buffer = toStringify ? JSON.stringify(message) : message;
  if (typeof buffer === "string") {
    const textEncoder = new TextEncoder("utf-8");
    buffer = textEncoder.encode(buffer);
  }
  const bitString = String.fromCodePoint(...buffer);
  return window
    .btoa(bitString)
    .replace(/=/gi, "")
    .replace(/\//gi, "_")
    .replace(/\+/gi, "-");
}
function getMessage(composer) {
  return `${toBase64url(composer.header, true)}.${toBase64url(
    composer.payload,
    true
  )}`;
}
function toBuffer(message) {
  return new TextEncoder().encode(message);
}
async function signAndExportJwtToken(jwtPrivateKey, composer) {
  const jsonPrivateKey = JSON.parse(jwtPrivateKey);
  const privateKey = await crypto.subtle.importKey(
    "jwk",
    jsonPrivateKey,
    {
      name: "ECDSA",
      namedCurve: jsonPrivateKey.crv,
    },
    false,
    ["sign"]
  );

  // ---
  const message = getMessage(composer);
  const signatureBuffer = await crypto.subtle.sign(
    {
      name: privateKey.algorithm.name,
      hash: privateKey.algorithm.namedCurve.replace(/P/gi, "SHA"),
    },
    privateKey,
    toBuffer(message)
  );

  // ---
  const signatureUint8 = new Uint8Array(signatureBuffer);
  return `${message}.${toBase64url(signatureUint8)}`;
}
3.3 Grant S2S consent
After signing your consent challenge, finalize granting S2S consent for your project.
- Call the
grantConsentWithServerSignaturemutation. - Add your consent ID and signed consent challenge.
- Add a success payload and rejections.
mutation GrantS2s {
  grantConsentWithServerSignature(
    input: {
      consentId: "$YOUR_CONSENT_ID"
      signature: "$YOUR_SIGNED_CONSENT_CHALLENGE"
    }
  ) {
    ... on GrantConsentWithServerSignatureSuccessPayload {
      __typename
      consent {
        consentUrl
      }
    }
    ... on ConsentNotFoundRejection {
      __typename
      consentId
      message
    }
  }
}
{
  "data": {
    "grantConsentWithServerSignature": {
      "__typename": "GrantConsentWithServerSignatureSuccessPayload",
      "consent": {
        "id": "$YOUR_CONSENT_ID",
        "status": "Accepted"
      }
    }
  }
}
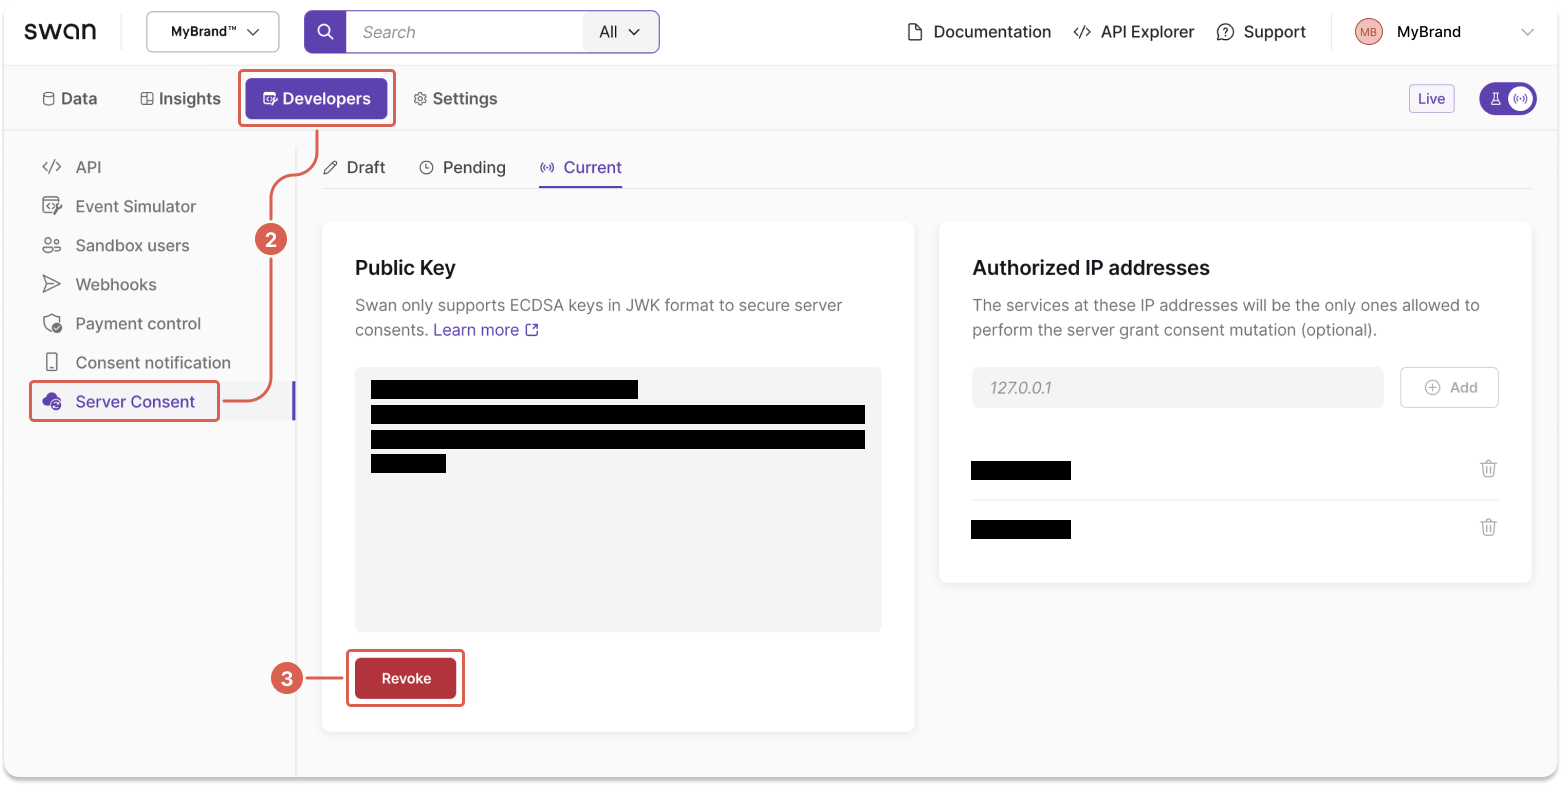
Step 4: Replace or revoke your public key
You can replace or revoke an installed public key at any time.
Swan strongly advises you to replace your key pair every two years.
- Before replacing your existing public key, make sure to pause all operations and consents that are using S2S consent.
- Go to Dashboard > Developers > Server Consent.
- Click Revoke.
- To install a new public key, follow the guide on this page to generate and install your new keys and consent with the new key pair.
If you revoke or remove your key without installing a new one, Swan automatically rejects all new S2S consent requests. You can't reuse a revoked public key in the Live environment.